Tools Needed
- Garden tools: shovel, rake, wheelbarrow.
- Carpenter’s tools: saw, hammer, tape ruler, string, level.
- Cement finishing tools: finishing trowel, wood float, edger, darby, mixing box or power mixer, depending on the size of the job.
- QUIKRETE® Concrete Mix or QUIKRETE® 5000 Concrete Mix (To determine amount, measure each step as a slab.)
- Sand or gravel for fill
- Double-headed nails
- Plywood for side forms (5-ply)
- 2″ X 8″ and 2″ X 4″ lumber for forms and stakes
- Oil (to ease form removal)
Designing the Steps
These dimensional guidelines should be followed for safety reasons:
- Height of each step (“riser”) should be the same (6 to 8 inches).
- Depth of each step (“tread”) should also remain constant (10 to 12 inches).
- If step is to serve as a “landing,” it should be at least 3 feet deep.
Preparing the Base
Level all ground in front of door. Remove all grass roots and other organic matter from the surface. Dig to a depth of 6 inches. Use sand, gravel or other fill (4 inches maximum) to bring site to a uniform grade. Compact the fill by dampening, then tamping. Base should be uniform, hard and free from foreign matter.
Building the Forms
Use 1/2-inch sheets of plywood for the side forms. Cut according to step dimensions desired. When designing forms, allow extra depth for fill below ground level. Drive 2″ X 4″ stakes, allowing a half inch between stakes and intended side of steps, thus providing space for plywood form. Use a level to keep side forms perfectly vertical. Nail side forms to stakes and brace all stakes with additional 2″ X 4″‘s. If steps are to abut house or other foundation, apply a half-inch mastic expansion joint. Coat all inside surfaces of forms with oil. This eases removal.
Pouring the Concrete
It is important to mix and pour entire project at one time, thus producing a solid integral mass.
To determine the amount of concrete necessary, measure each step as an 8-inch slab. Overfill forms slightly. Work a shovel in and out to eliminate air pockets, and to compact the mix. Solid rubble such as broken block or brick may be worked in, reducing the amount of concrete mix required. Work the mix in and around all rubble thoroughly.
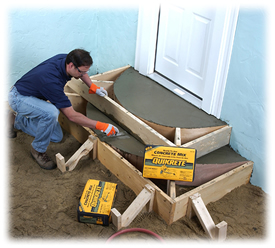
Finishing and Smoothing the Surface
After spreading and compacting the mix to fill the forms, “strike off” and float immediately. To “strike off”, simply nose the edge of a 2″ X 4″ back and forth with a saw-like motion to smooth the concrete. Then use a “darby” (smooth board 3-1/2 inches wide and 3 feet long with a handle on top) to level ridges and fill voids. These two procedures help embed all particles of coarse stone or gravel slightly below the surface. Wait until all water has evaporated from surface before final smoothing or troweling. When surface has turned dull, use edging tool to round the edges. An edger with a 1/2″ radius is recommended. The remaining concrete should be completely smoothed and compacted by troweling. For best results keep the trowel pressed flat, sweeping back and forth in an arc, each pass overlapping half of the previous pass. Excellent results can be attained by using a steel trowel that measures approximately 4″ X 14″. To produce a textured non-skid surface, use a wood float for final troweling.
Curing
Proper curing of all cement mixes is necessary for maximum strength to be achieved. Concrete which has been moist-cured will be approximately 50% stronger than that exposed to dry air. Concrete reaches 98% of its strength in 28 days. Keep concrete damp for a period of 5 to 7 days after it has been poured. This helps the hardening (hydrating) process, thus producing a more durable surface. After concrete has cured remove forms.