Tools Needed
- QUIKRETE® Concrete Mix/ QUIKRETE® 5000
- Shovel
- Rake
- Wheelbarrow
- Carpenters Tools: saw, hammer, tape rule, string, level.
- Cement Tools: jointing tool, edger, float, trowel, strike off board, darby (smooth board 3.5″ wide and 3.5′ long)
- 4 Each 2″ X 4″ X 8′ Boards
- QUIKRETE® Expansion Joints
- Approx. 24-(80lb) bags or 32-(60lb) bags will cover approx. 48 sq.ft. at 4″ thick.

QUIKRETE® 5000 is the ideal choice for applications requiring high early strength. Because it gains strength quickly, it is ideal for cold weather applications. QUIKRETE® 5000 achieves 5,000 psi after 28 days. QUIKRETE® Crack Resistant Concrete Mix is ideal for projects needing a structural base and will help resist cracking and spalling for years to come, like Fiber-Reinforced, Crack Resistant Concrete eliminates the need for wire mesh reinforcement.
QUIKRETE® Fiber-Reinforced Concrete Mix eliminates the need for wire mesh reinforcement. It also offers increased resistance to surface cracking and chipping.
QUIKRETE® Concrete Mix is a good general-purpose mix for sidewalk and slab work.
QUIKRETE® All-Purpose Gravel or crushed stone (if needed)
T-square, measuring tape, mason’s line, pickax, rake tample, hammer or half-hatchet, darby or bull float, hand float, finishing trowel, bricklayer’s trowel, edger.
Private walks leading to the front entrance of a home should be 3′ to 4′ wide. Service walks connecting to back or side entrances can be 2′ to 3′ wide. Sidewalks should be at least 4″ in thickness. Simple slabs for small foundations, bases, etc., normally 4″ to 6″ thick, depending on the load they must bear. Slope the walk away from buildings to provide proper drainage. Slopes of ¼” per foot are generally recommended, but check local codes and conditions.
Site Preparation
- Stake out the area for the walk or slab, using a T-square, measuring tape and twine. Use a line level to ensure proper placement and slope of lines.
- Remove the sod and soil to the desired depth. Remember to account for the width of the forming lumber
- Nail and take the forms in place. You may have to dig a slight trench to set the forms at the correct height.
- Backfill against the forms to ensure stability.
- Use the level to check for proper slope. Notice that when held level, the right end of the level is about ½” above the outside form, indicating a slight slope away from the building.
- Tamp the sub base firm; then check for proper form depth, here 4″.
Options
For larger jobs, or in areas of poor drainage, dig to a greater depth and add several inches of QUIKRETE® All-Purpose Gravel or crushed stone to the sub base. When QUIKRETE® Concrete Mix is used it may be desirable to add wire mesh reinforcement to the form. Support the mesh on small stones so it is suspended at the midpoint in the slab.
Mixing and Placement
- Add approximately ¾ of the expected amount of mixing water to the mixer. Turn on the power mixer, and add the QUIKRETE® Fiber-Reinforced Concrete, QUIKRETE® 5000 or Concrete Mix. Add more water as needed to obtain a plastic-like consistency. Do not exceed mixer capacity. Note: QUIKRETE® concrete mixes can also be mixed manually in a wheelbarrow or a mortar box.
- Dampen the subgrade before making the pour. Note the use of a splash board to help direct the flow.
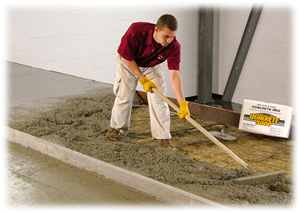
- Spread the concrete throughout the form, working it in tight against corners and edges.
- Strike off the concrete level with the top of the forms using the screed board. Fill in any low spots as you work. Several passes may be needed.
- Float the concrete surface smooth, using a wooden or metal float or darby. Swing the tool in circles, holding the leading edge of the tool up slightly to keep it from digging into the concrete. Float the entire slab. Stop floating when the entire slap is fairly smooth and the float does not leave visible marks. All stone and gravel in the mix should have been worked below the surface.
- Cut the concrete away from the forms by running an edging tool along the forms to compact the slab edges.
- Using a straight piece of lumber as a guide, cut 1″ control joints into the slab every 6′ to 8′ using a grooving tool. Note: When a coarse finish is desired for nonslip footing, floating, edging and grooving may be the only steps performed. When a denser, smoother finish is required the surface is troweled once or several times with a stainless steel trowel. Troweling takes place after the surface moisture has evaporated from the surface and the concrete has lost its sheen. This setting time may vary greatly with weather conditions and the moisture content of the mix, from 30 minutes to several hours. Thirty minutes to an hour is average in most cases.
- Once the concrete has set up, swing the trowel in the same circular pressing and polishing motion that was used in floating. Continue working until the surface is smooth and dense. You may wish to allow the concrete to continue to harden and then trowel once more for the densest possible finish. After troweling, redo edges and grooves.
- Properly cure the concrete with Acrylic Concrete Cure & Seal. After the concrete has hardened sufficiently, 48 hours or so, carefully remove the forms.